Introduction
In case you are a primarily a backend developer with some fundamental frontend abilities it may be time-consuming and difficult to design a frontend UI to show information that your backend returns however due to the free star admin bootstrap template we are able to save ourselves quite a lot of work and so we are able to focus simply on our backend logic.
Conditions
To comply with alongside, you’ll want the next:
- A LAMP Stack (you possibly can select both XAMP, MAMP, WAMP) put in in your machine. The stack you choose could also be based mostly upon your OS or simply your liking. I’ll be utilizing MAMP all through this tutorial.
- The Star Admin template. You will discover it right here
- To obtain and use this template, we’ll must clone onto our machine from right here
Let’s dive in…
In regards to the Utility
On this submit, we’ll stroll via the steps of constructing an admin panel for a warehouse administration system app utilizing PHP, MySQL, and the Star admin Bootstrap template. To maintain the app easy, there might be two components to it:
A Dashboard Part and an Stock administration part. Within the Stock administration part, As a person, you possibly can Lookup, Add, Edit, Delete stock objects and within the Dashboard part, we’ll take leverage the facility of chartJS to that the Stars Admin template comes pre-packed with to Graphically show the variety of objects for every class and since this a warehouse administration app we’ll additionally characterize the overall variety of stock objects distributed and acquired for every class (Clothes, Family, Stationery, Electronics, Sports activities)
Right here’s what the ultimate app would appear like:
Warehouse Administration System App – The Dashboard part
Warehouse Administration System App – The Handle Stock part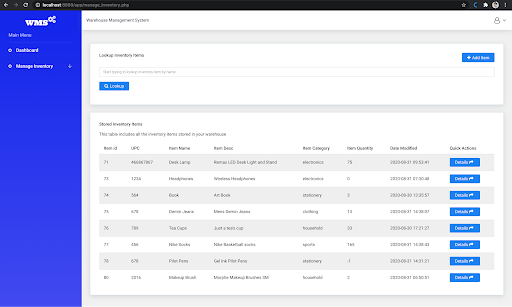
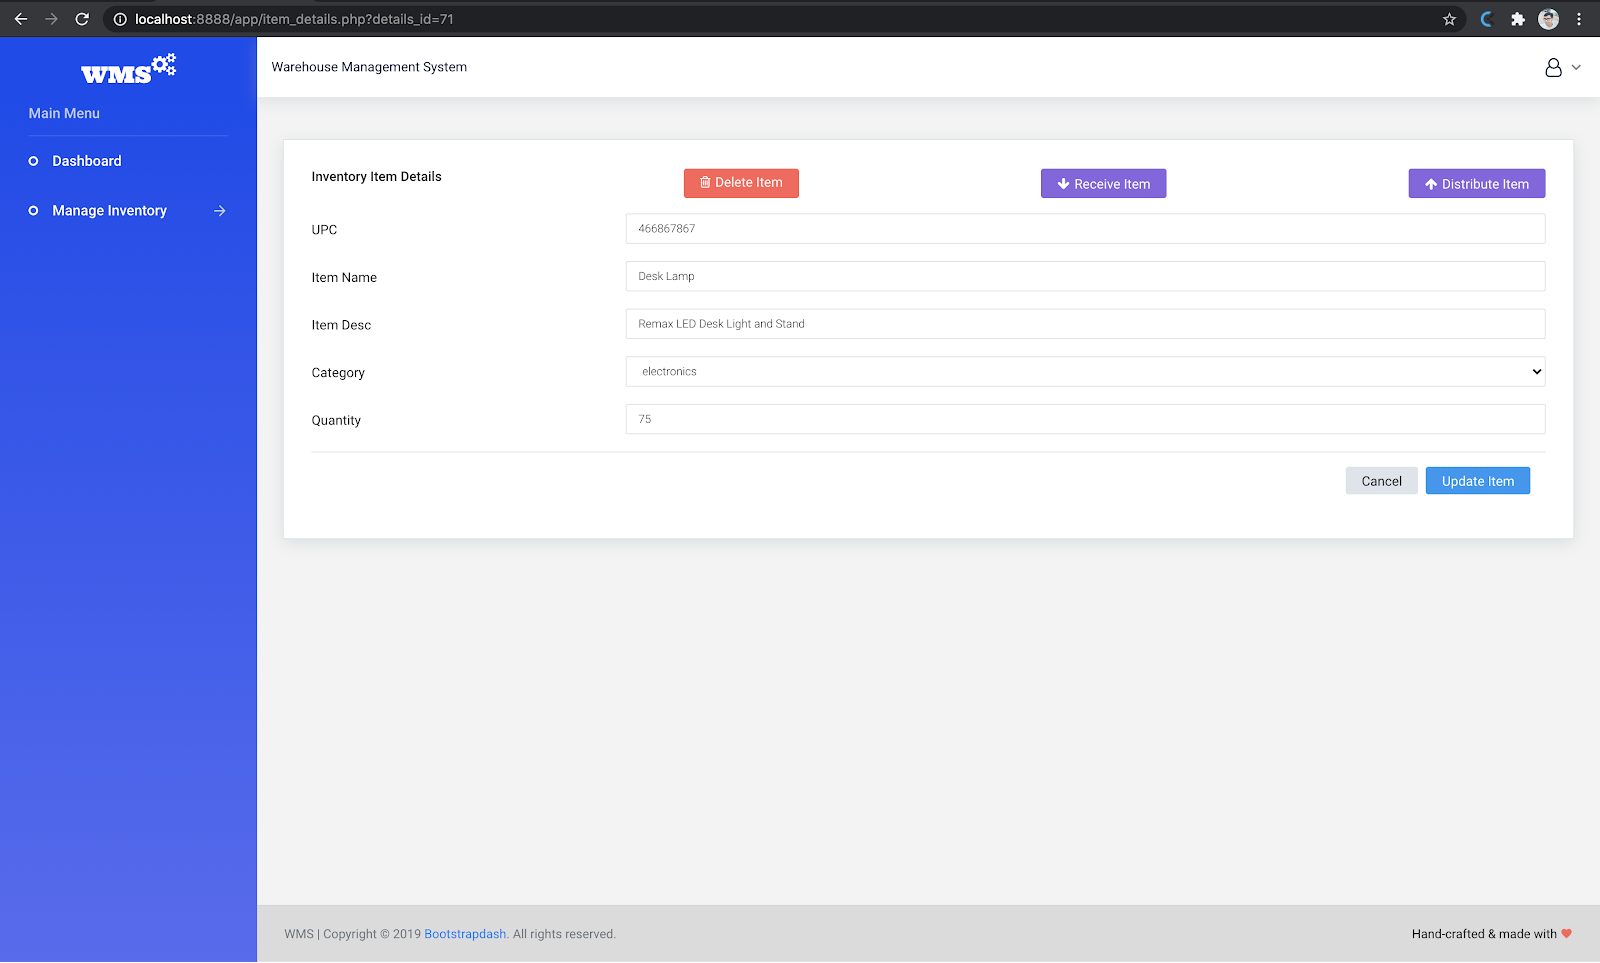
Warehouse Administration System App – Merchandise Particulars (The person will get right here by clicking on the element button from the desk proven within the handle stock part)
Establishing
Getting the free Bootstrap Star admin template
In regards to the Star admin template
The Star Admin template is a free admin template created utilizing Bootstrap 4 which is launched beneath MIT license. This license allows you to obtain and use the template for any venture whether or not free or industrial.
Let’s go get this template!
- Clone this template to your machine from GitHub (you possibly can clone this to your desktop) https://github.com/BootstrapDash/StarAdmin-Free-Bootstrap-Admin-Template/.
- We’ll return to this quickly, let’s transfer on to organising our LAMP Stack.
LAMP Stack
- Obtain the LAMP Stack of your selection as we referred to as out within the Conditions part. Every might have totally different setup directions that you simply’ll must comply with.
- As soon as the LAMP stack is put in (I’ll be utilizing MAMP) find the htdocs folder
- Create a folder referred to as app inside the htdocs folder
Creating the database
Allow us to go forward and create the database that our app will connect with and use. To make this straightforward on you, I’ve created a .sql file that you would be able to import into phpMyAdmin to create the tables and populate the tables with pattern information. Listed below are the steps:
1. Launch phpMyAdmin
2. Create a brand new database referred to as wms_db
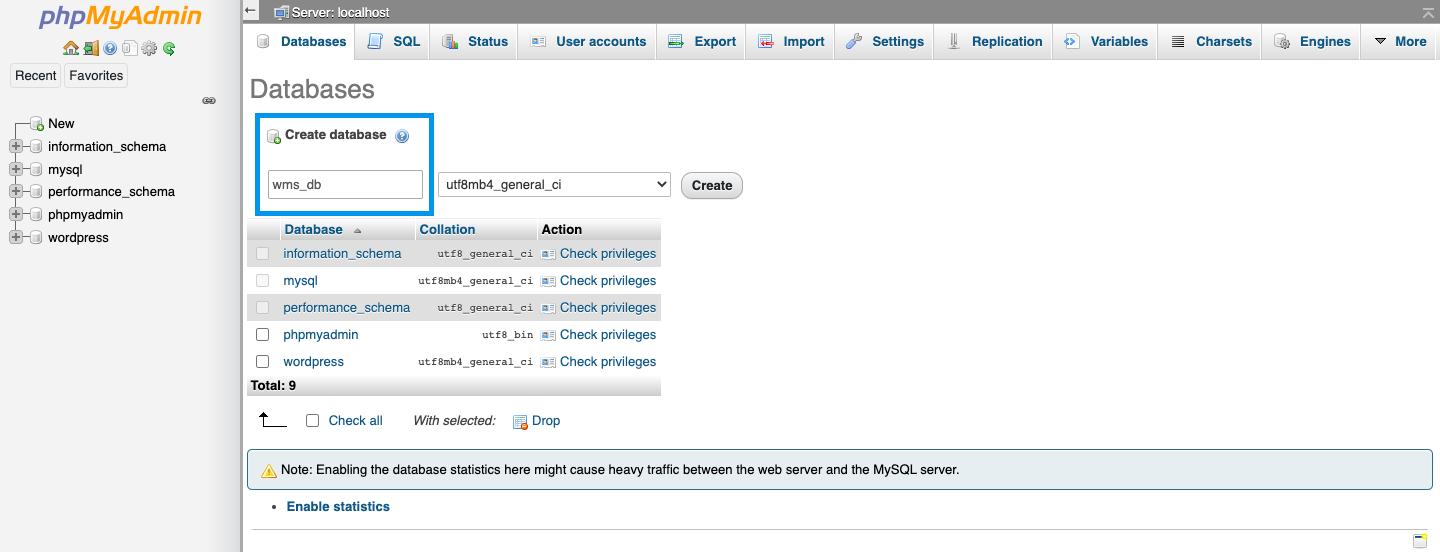
3. Choose the database from the left navigation in phpMyAdmin and click on on the import tab

4. Obtain the next file: wms db.sql then add it and click on on Go.
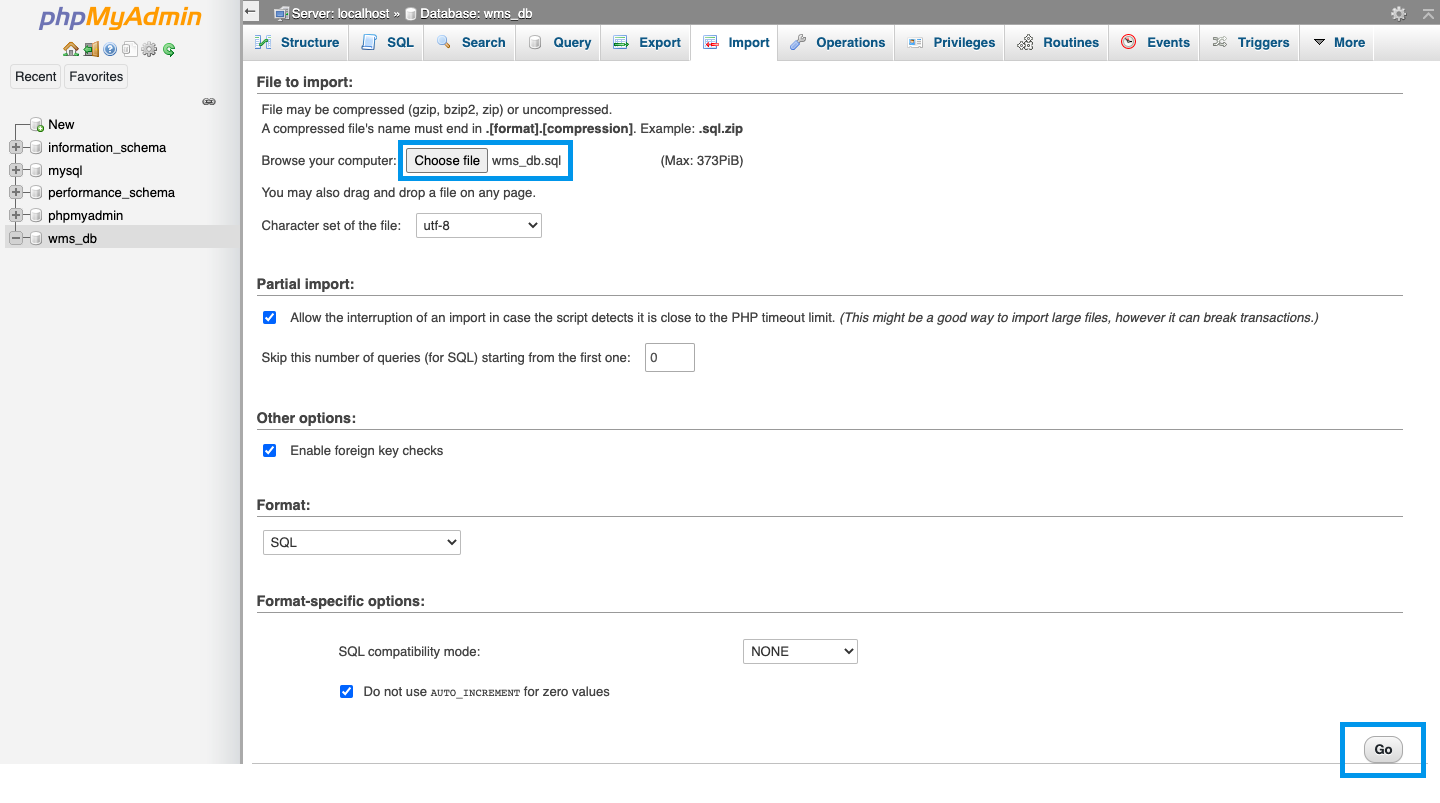
This may import two tables to the wms_db database we created, the inventory_items, and the distribute_receive desk.
The inventory_items desk will appear like:
| id | upc | item_name | item_desc | class | amount | last_modified |
The distribute_receive desk will appear like:
| class | distribute_total | receive_total |
And whereas we’re right here, let’s add a person account with information and construction rights to our database:
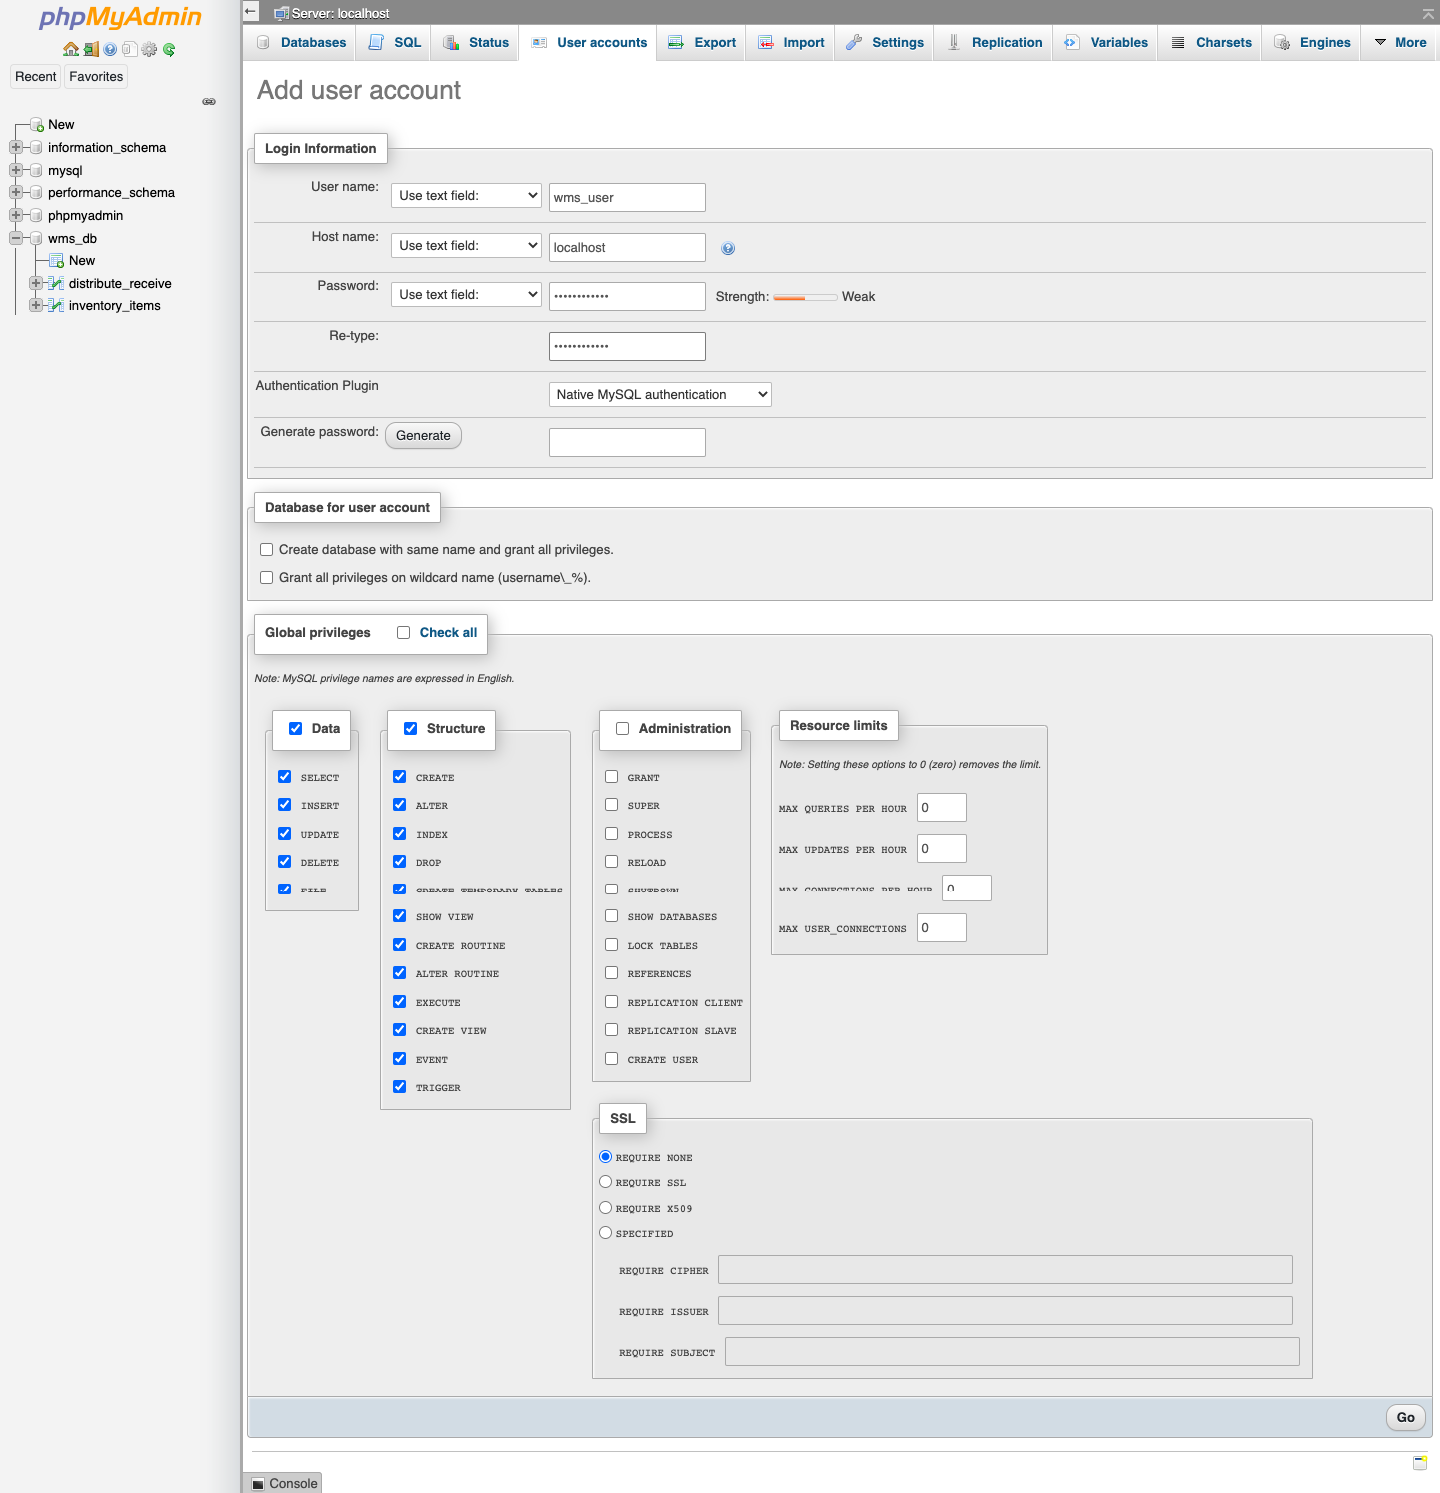
Consumer title: wms_user
Host title: native or localhost
Password: wms_password
Authentication Plugin: Native MySQL authentication
Persevering with…
Establishing the venture construction
Open up the app folder we added to the htdocs folder and create the next folders and information:
database (folder)
features (folder)
partials (folder)
index.php (file)
item_details.php (file)
manage_inventory.php (file)
Getting the Star Admin bootstrap template property
- Subsequent, find the property folder from the template repo folder we cloned earlier, yow will discover it in StarAdmin-Free-BootStrap-Admin-Template/src/
- Copy the property folder into the app folder that’s discovered inside the htdocs folder
That’s it for the venture construction, Let’s get constructing
Growing the App
By trying on the venture construction you possibly can see that now we have totally different information and folders, let’s rapidly take a look at how every of those match collectively to create our app and add the mandatory information to these folders.
property
The property folder consists of fonts, CSS, and JavaScript information that help our app’s frontend look and performance. We’ll simply an extra JavaScript file and modify one other:
On the handle stock web page, we need to give the person the power to robotically see search recommendations of the names of stock objects as they start to kind the primary letter, it will look one thing like:
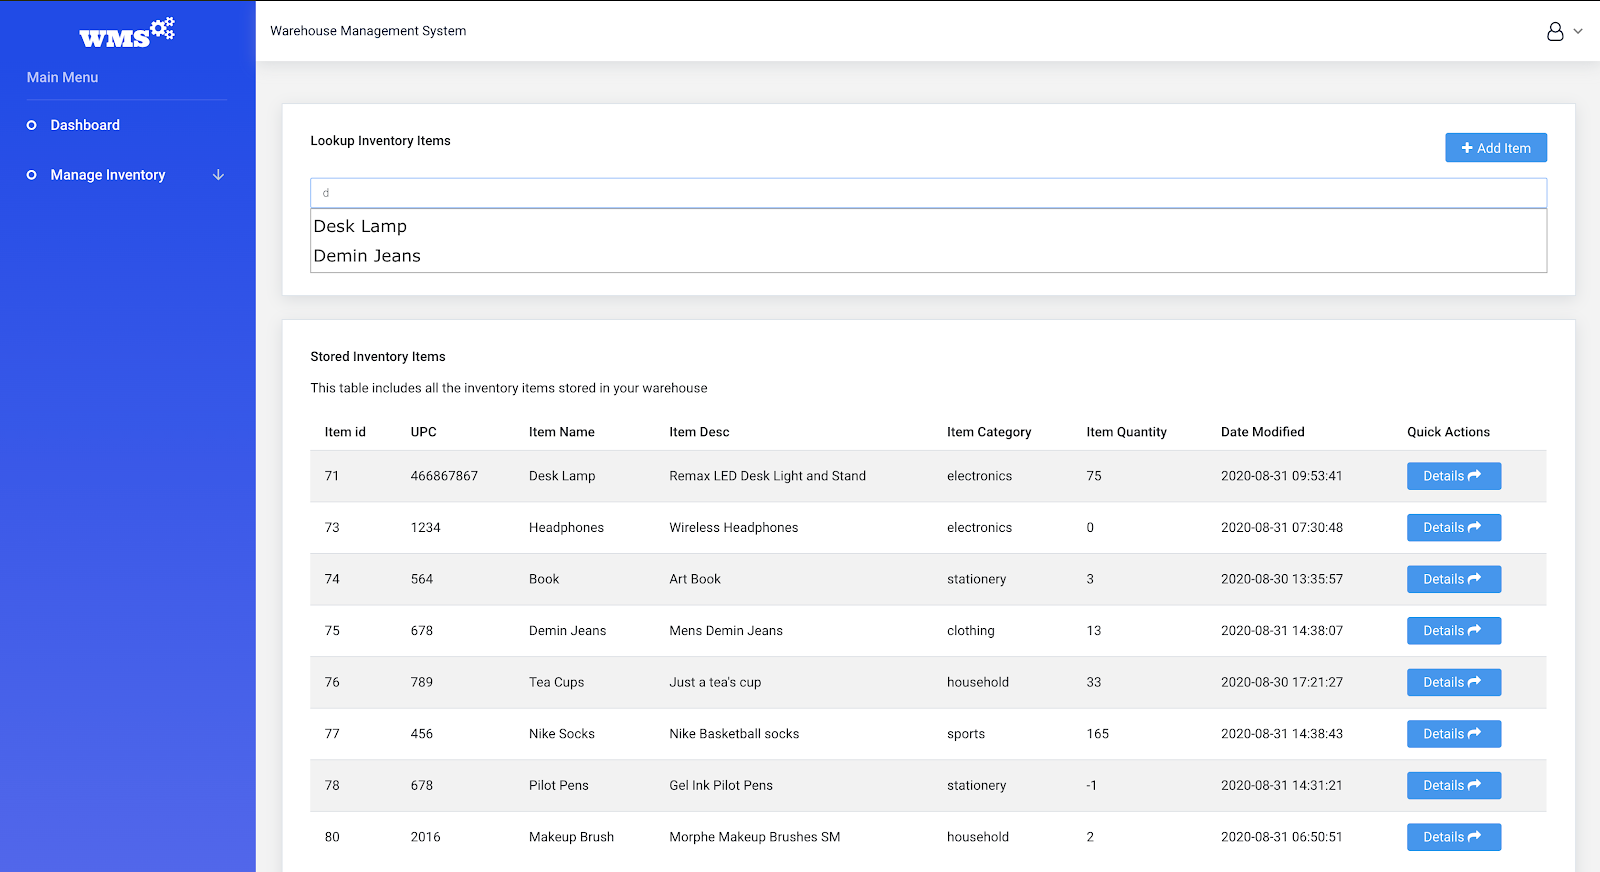
Discover, because the person sorts the primary letter, which is d on this case, recommendations are returned. To implement this characteristic now we have to do three(3) issues:
- We’ll want jQuery together with each the CSS and JavaScript for jQuery UI
- Create a PHP file that features a perform that may carry out a LIKE lookup of the names of stock objects and return the outcomes.
- Then we’ll must outline a customized javaScript perform that may maintain listening to the letters because the person sorts then name the PHP perform outlined above after which show the recommendations to the person.
Right here is how we’ll add this characteristic:
- The particular jQuery model and the jQueryUI model I’ll be utilizing are as follows
- jQuery: http://code.jquery.com/jquery-1.9.1.min.js
- jQueryUI javaScript: https://code.jquery.com/ui/1.12.1/jquery-ui.min.js
- jQueryUI CSS: http://ajax.googleapis.com/ajax/libs/jqueryui/1.10.1/themes/base/minified/jquery-ui.min.css
In a later step, we’ll embrace these, I’ve determined to name these out right here on your reference… however the subsequent steps are essential to comply with
2. Create a file within the features folder (htdocs/app/features) referred to as auto_search.php with the next code:
<?php require_once('../database/db_credentials.php'); ?>
<?php
// examine if the search time period is current within the url
if(isset($_GET['term'])) {
// sanitize the enter information and assign variables
$time period = filter_var($_GET['term'], FILTER_SANITIZE_STRING);
// make connection to db
$con = mysqli_connect(DB_SERVER, DB_USER, DB_PASS, DB_NAME);
// examine for db connection errors
if (mysqli_connect_errno()) {
echo "Failed to connect with MySQL: " . mysqli_connect_error();
exit();
}
// outline SQL Question
$sql = "SELECT item_name FROM inventory_items WHERE item_name LIKE '$time period%'";
$consequence = mysqli_query($con, $sql);
// loop over consequence and assign information to array
whereas($row = mysqli_fetch_assoc($consequence)) {
$returned_array[] = $row["item_name"];
}
// return the array in JSON format
if(isset($returned_array)) {
echo(json_encode($returned_array));
}
// shut the connection
mysqli_close($con);
}
?>
Each time this file known as by the javaScript perform, it checks if the person has specified a time period, then it queries the inventory_items desk and returns all of the stock objects if their names are just like the time period the person sorts and return the ends in a JSON encoded array that the auto_search.js file can parse and use
3. Within the property/js folder create a JavaScript file referred to as auto_search.js with the next content material:
$(perform() {
//autocomplete
$(".auto").autocomplete({
supply: "features/auto_search.php",
minLength: 1
});
});
The perform on this file will get referred to as robotically when the person sorts into the enter subject on the handle stock web page (We’ll get to this afterward, however for now, maintain this idea in thoughts). Discover that the contents of the perform on this file are very small, the jQueryUI library does the heavy lifting for us. All now we have to do is specify the category title of the enter subject that we wish the autocomplete technique to be linked to (on this case, that is the enter subject that the person sorts into, and this enter subject has a category title referred to as auto) and add a supply which is the auto_seach.php file we created just lately and eventually we specify the minLenght worth which is the minimal quantity of letters that enter subject ought to comprise earlier than we do an merchandise title lookup.
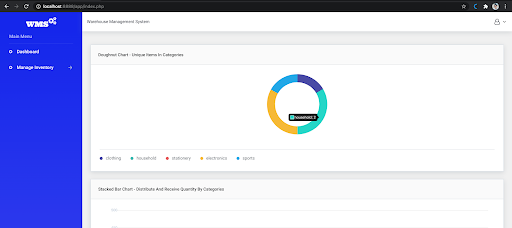
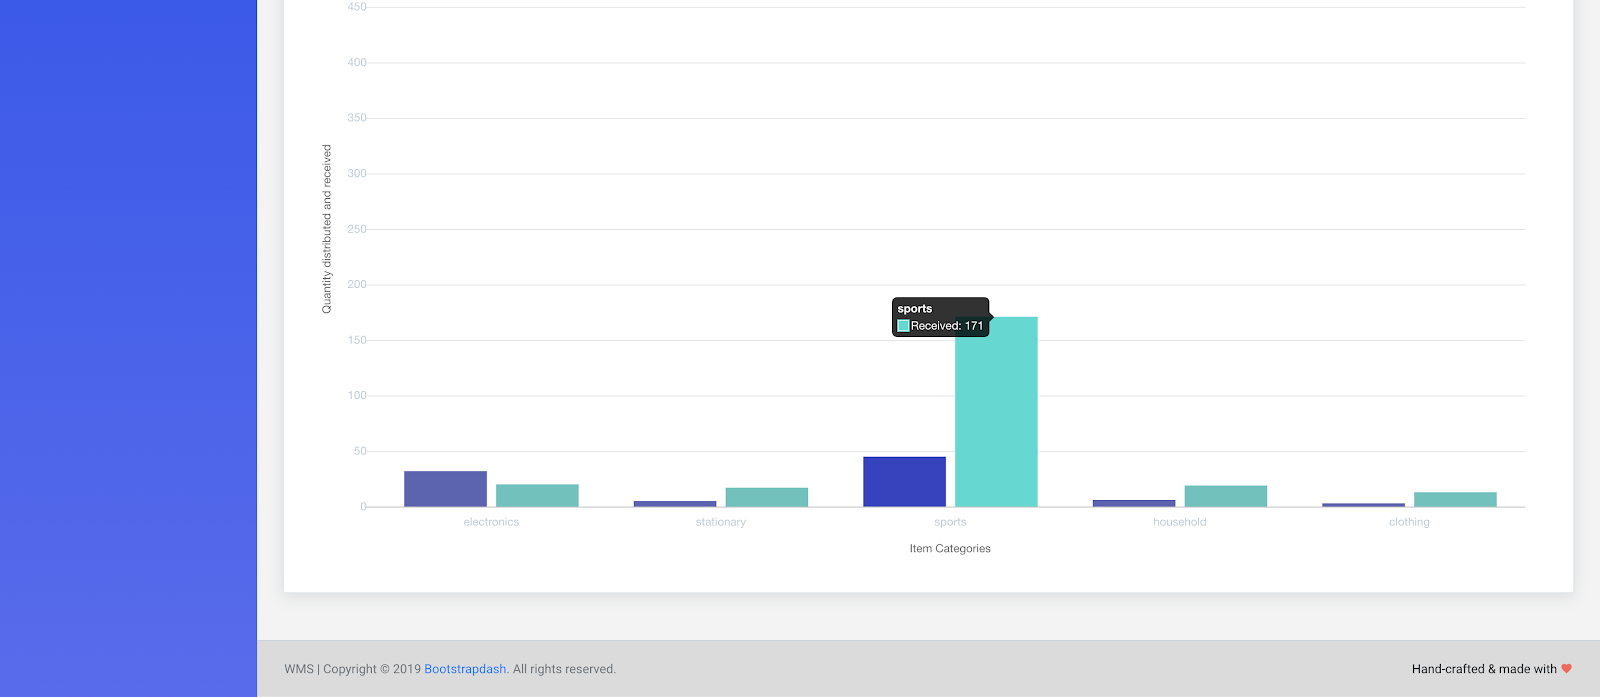
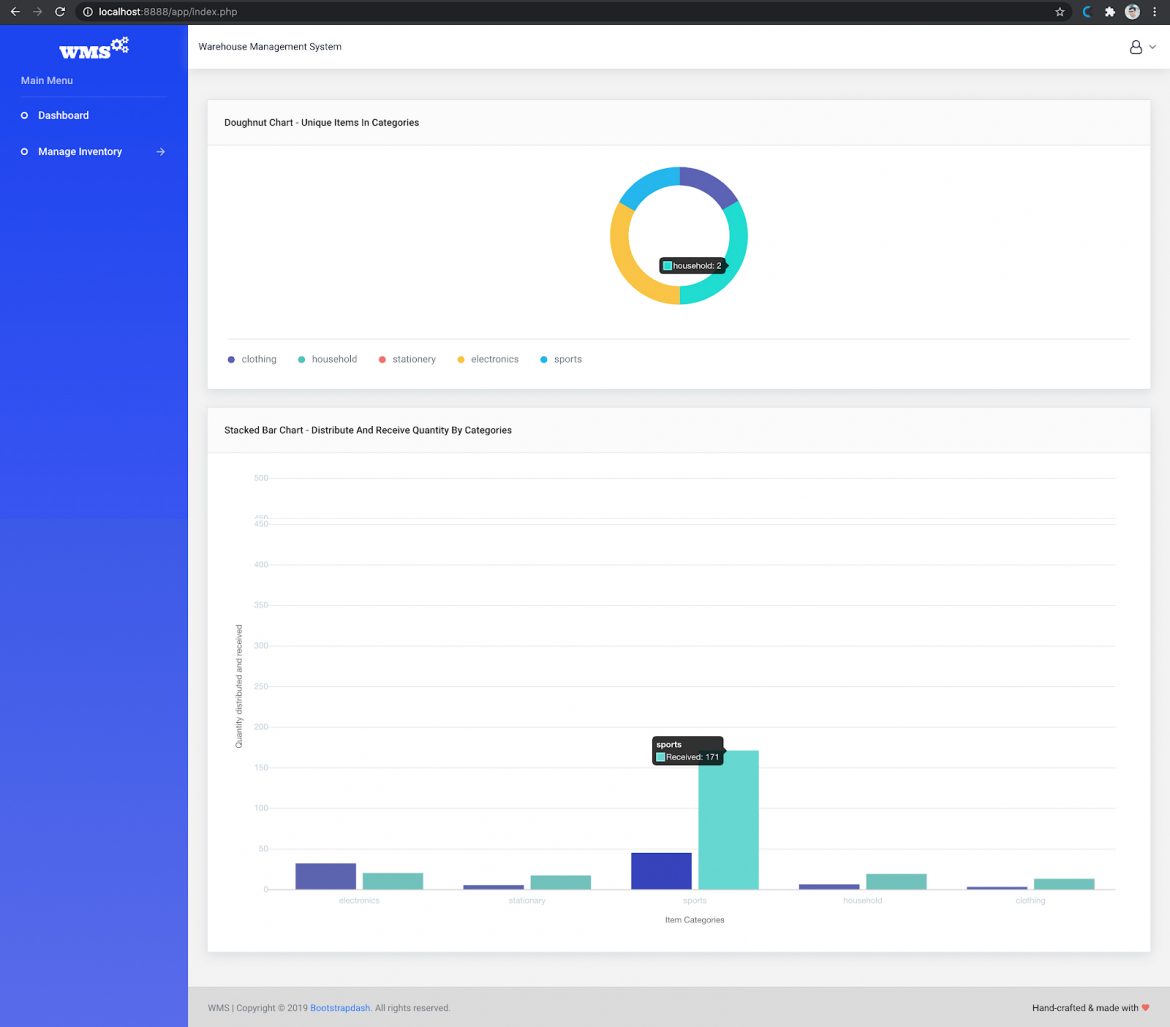
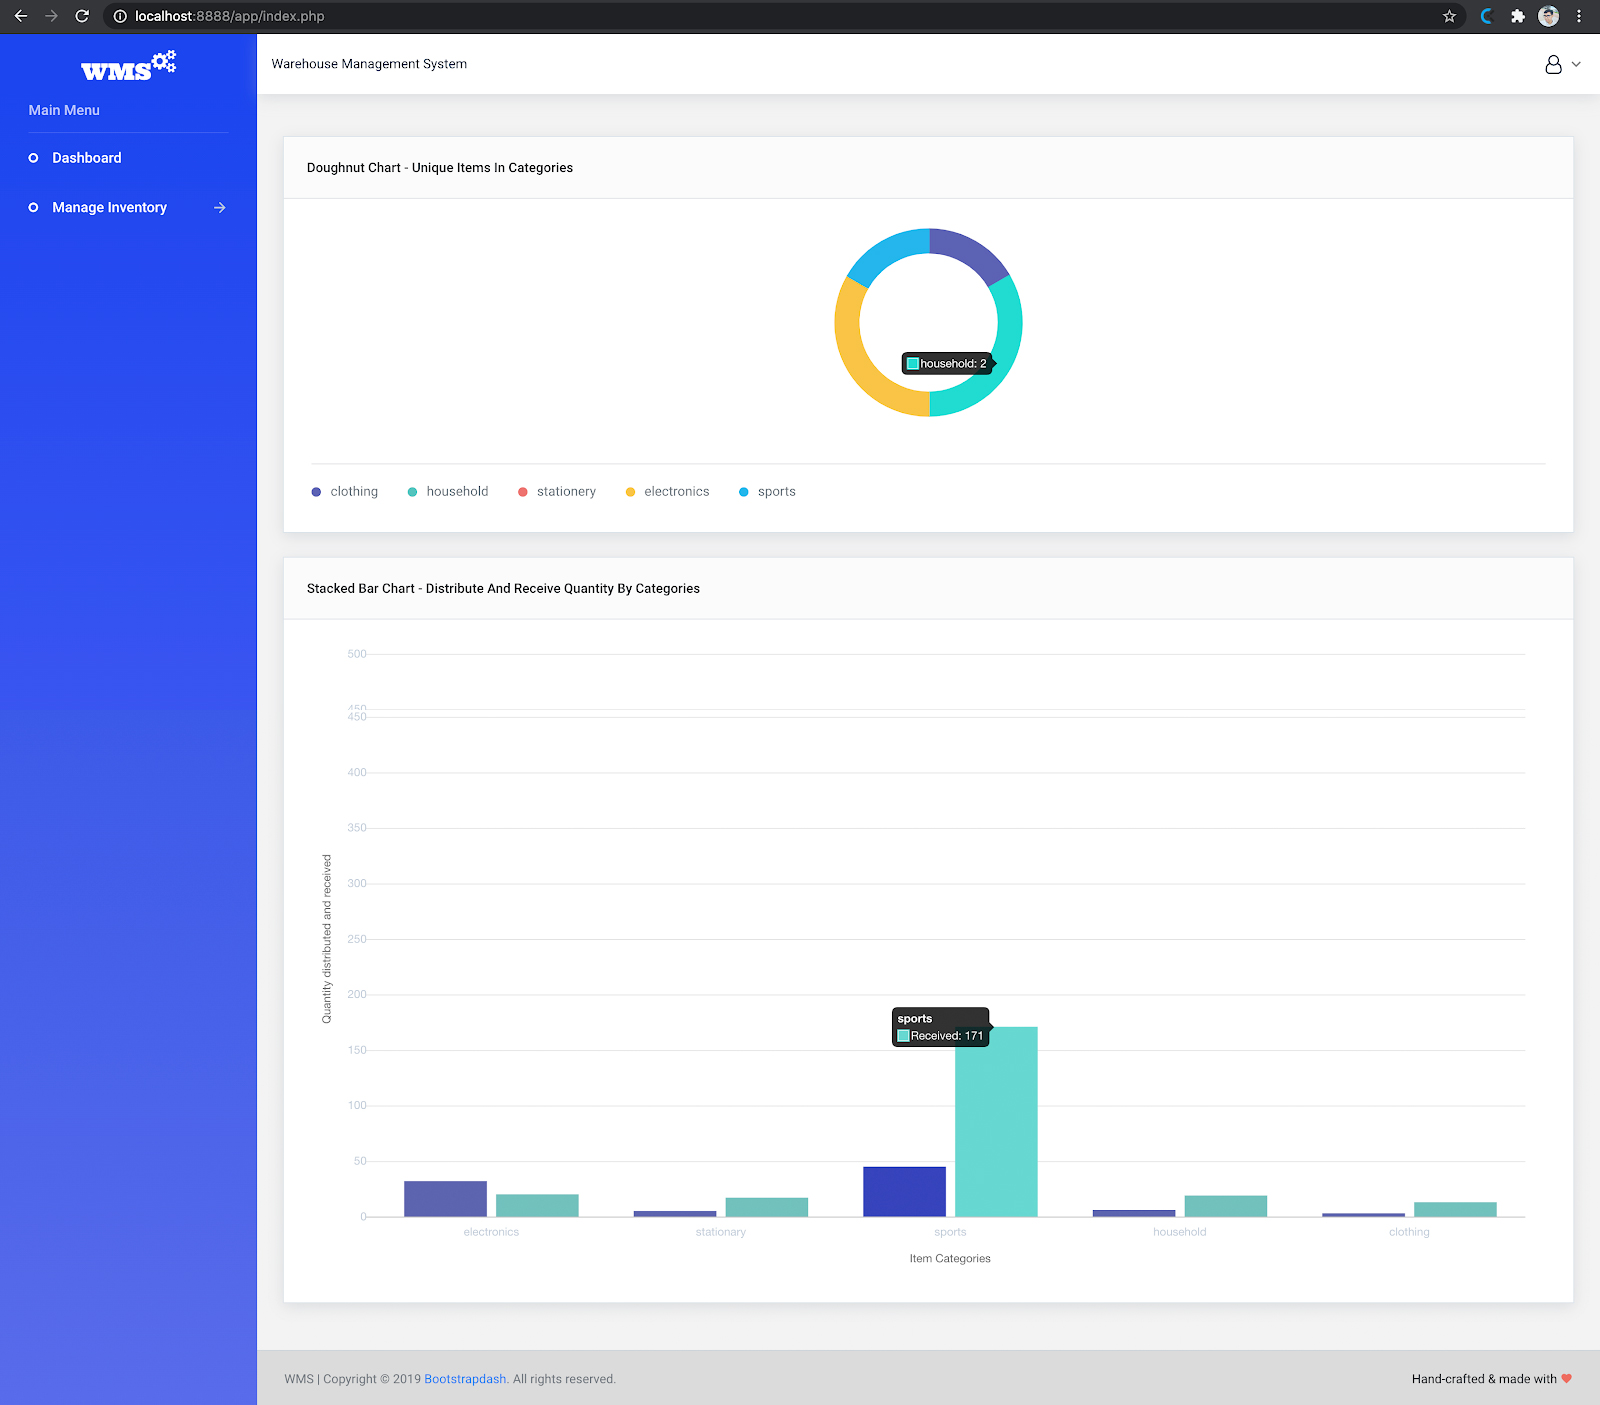
On the Dashboard web page, we need to show two charts to the person. The primary might be a Doughnut Chart exhibiting the variety of distinctive objects in every class, and provided that this can be a warehouse, The second chart might be a Stacked Bar Chart that reveals the overall amount of things distributed and acquired inside their respective classes: